How to Migrate Your Site from Imgix to ImageEngine
Monday, October 26, 2020
We have had a lot of folks ask us how they can move from Imgix to ImageEngine. Imgix is an online image processor whereas ImageEngine is an image CDN. Both focus on improving website speeds by reducing image payloads and speeding up delivery.
Based on the more significant differences between the two services (as detailed below), you might be ready to pack your bags (or images) and migrate from Imgix to ImageEngine. In the following steps, we’ll run you straight through the process as well as get you started with using ImageEngine.
Why Migrate to ImageEngine?
While Imgix is an easy-to-use image processor that’s strength lies in its expansive API featuring advanced image transformation and manipulation, there are a number of reasons why you might prefer ImageEngine’s image CDN for your needs:
- A more automated experience for using advanced image optimization.
- Generally better image optimization and performance.
- Native and in-house plugins to integrate the ImageEngine CDN with WordPress or Magento.
- A broader range of device-specific image optimizations thanks to WURFL device detection as well as automatic WebP or JPEG 2000 conversion.
- As a result of the above, overall better performance in reducing image payload and speeding image delivery.
- Stable billing at a flat monthly rate.
To get more in-depth detail of the differences between these two image CDNs, you can check out this comparison.
Set up a new ImageEngine account
To avoid image CDN downtime as you transition from Imgix to ImageEngine, we recommend setting up an ImageEngine account before leaving Imgix.
Step One: Sign up for ImageEngine
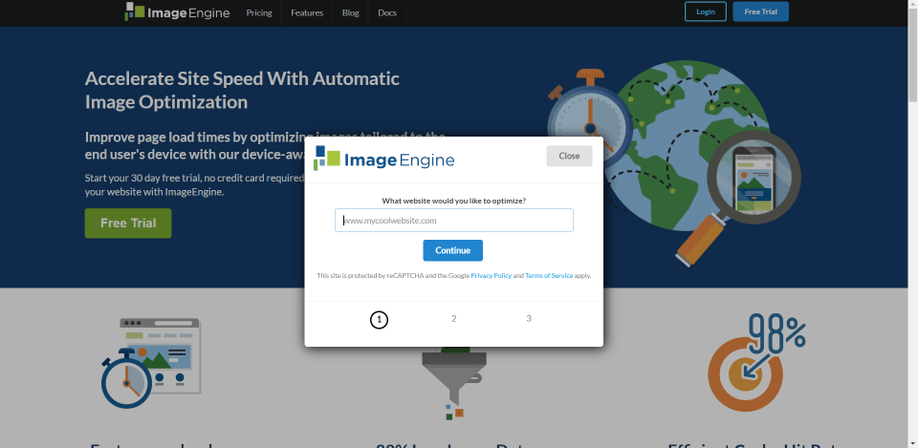
You can navigate here to sign up for a free 30-day trial. The process is very straightforward and should only take a matter of minutes:
- Provide the URL for the website you want to optimize, e.g., https://www.mywebsite.com.
-
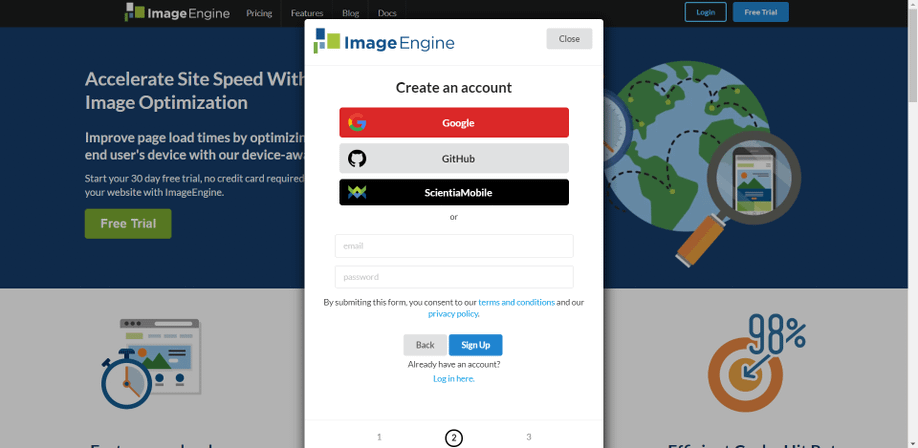
Next, create an account by either signing up with your Google, GitHub, or existing ScientiaMobile account or by just providing an email and password:
-
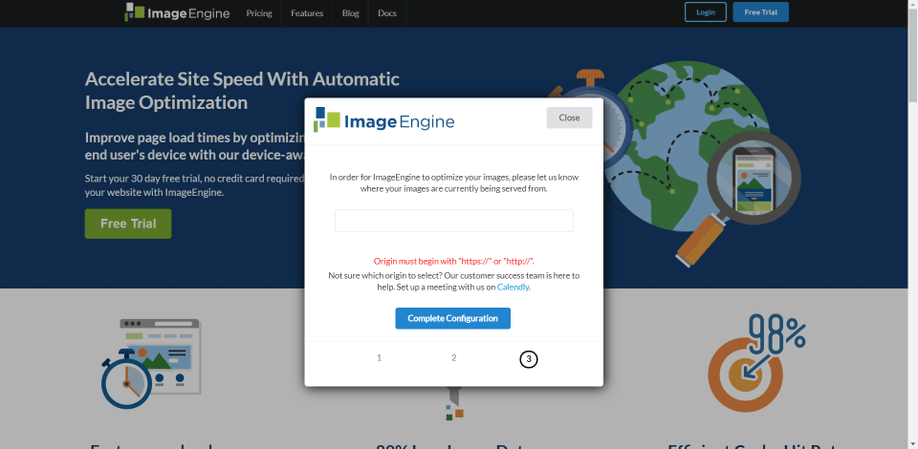
Now, it’s time to provide ImageEngine with the web location where your images are currently stored. You can use the same location as you did for your Imgix account. This can either be a web folder, Amazon S3 bucket, or Google Cloud storage location:
-
ImageEngine will now furnish you with a domain where your images will be served from in the format of {defaultstring}.cdn.imgeng.in:

Step Two: Find/Customize Your ImageEngine Delivery Address
If you’re happy with the delivery address (domain) you’ve been assigned, you can copy it somewhere for later use and move on. However, you can also customize your domain to better suit you.
To customize, log into your control panel. It’ll look something like this:
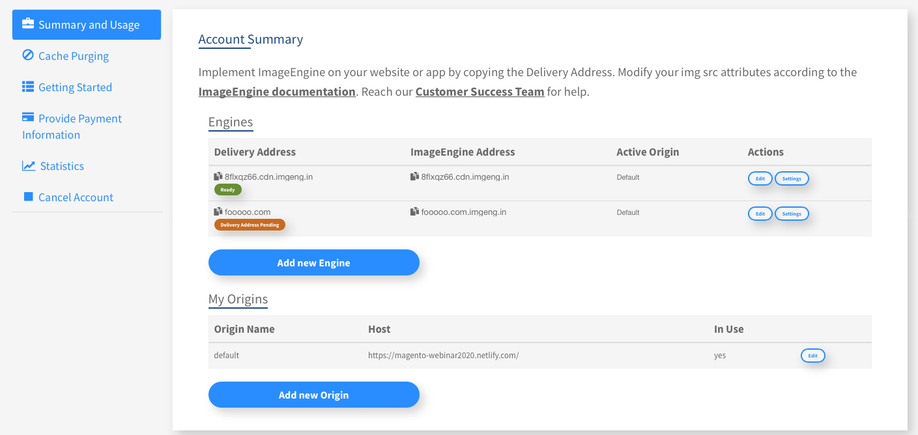
Under “Engines”, you can click “edit” to customize your image serving domain or you can click “Add new Engine” to add additional domains. This will allow you to customize your Delivery Address to something more familiar, like mywebsite.com.imgeng.in.
If you want to serve images from a different origin, you first need to add the origin below in the “My Origins” section and then refer to it when creating the property (I think you mean “creating the Engine”.
Whichever way you went, keep this custom delivery address handy for the next step.
Step Three: Replace Image URLs with Your New ImageEngine Delivery Address
When first joining Imgix, you will have had to go through exactly the same process. To serve optimized versions of your images via the ImageEngine CDN, you’ll need to replace or update the image URLs to reference images from your image-serving domain.
Typically, your image URLs would look something like this:
<img src=”https://mywebsite.com/images/image.jpg”/>
Using Imgix, the URL in the src attribute will most likely look something like this:
https://myimages.imgix.net/images/image.jpg
To serve images via ImageEngine, simply replace either your website or Imgix domain with the newly created ImageEngine domain. Using the example above that would be:
<img src=”https://mywebsite.imgeng.in/images/image.jpg”/>
I’m sure you can figure out the most efficient and convenient way for you to do this. You could do a simple find and replace for each image tag in your source files or run a simple server or client-side script. If you’re using a CMS, such as WordPress or Magento, ImageEngine provides an in-house plugin for easy integration.
For any other platform, you can check out the integration guides in the documentation but usually a simple mapping function, using either code or native tools.
Suspend Your Imgix Account
Because Imgix works on a pay-as-you-use basis, you’ll want to take every step to ensure you won’t be billed extra for a service you’re no longer using. While skipping ahead and deleting your account should do the trick, completing all the steps will be the most foolproof.
By completing step one and two below, you can also safely pause your Imgix account if you are considering using it for a different project in the future.
Step One: Disable Your Sources
To disable a source, just navigate to “Sources” in the main navigation menu and then click on “View” for the source:
https://img.scientiamobile.com/wp-content/uploads/2020/10/image2.png
When you’re in the source dashboard, click on the gear icon and then click “Disable”:

The source should now have a grey highlight instead of a green one just like the first source in the image above.
Step Two: Contact Imgix Support to Purge Your Cache
At this point, your source will no longer be active. However, images stored in the cache may still be triggered and served to visitors. To stop this, you’ll need to email Imgix support at support@imgix.com.
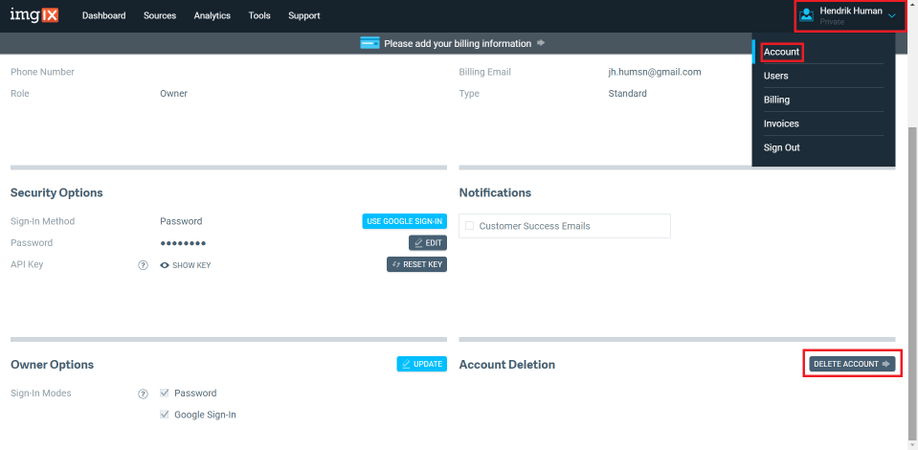
Step Three: Delete or Pause Your Imgix Account
If you go through and disable all of your sources, you will have effectively paused your Imgix account.
However, the option to completely delete your account still exists. To do this, go to your account settings as per the image below and click “Delete Account” under the “Account Deletion” section:
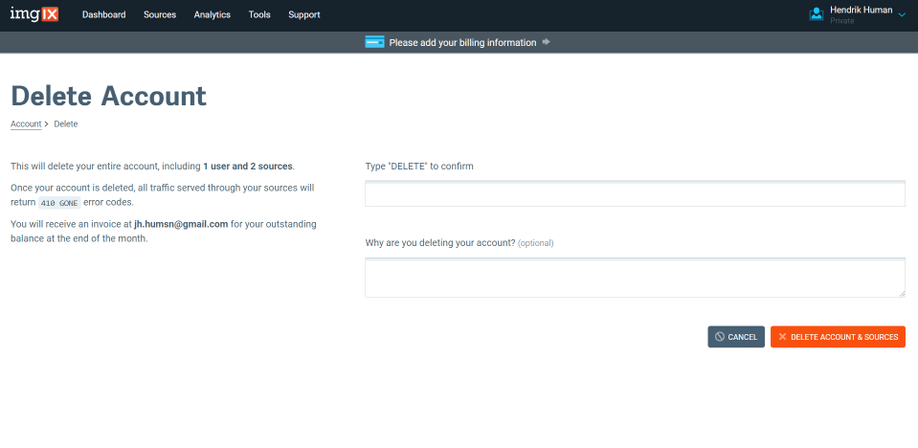
As this is the point of no return where you’ll lose access to your account dashboard, you’ll need to confirm your decision:
That’s all. You should now no longer incur any further usage on your Imgix account and can move to your new image CDN with peace of mind.
NOTE: You’ll still be invoiced at the end of the month for your usage up until this point but this should stop any additional usage leaking through on your account.
Verify ImageEngine is Serving Images and How to Pass Directives
OK, you should be up and running with ImageEngine and Imgix should no longer be serving your images. Now, let’s confirm ImageEngine is serving your images as it should.
Step One: Verify ImageEngine is Now Serving Your Images
You can easily check whether ImageEngine is receiving your origin images and serving it via your new image serving domain.
If the original location of your image is something like this:
https://mywebsite.com/images/image.jpg
Then you can just replace the domain where your images are hosted with your new ImageEngine domain, like so:
https://myimages.imgeng.in/images/image.jpg
– where you will use the *.imgeng.in domain you created when signing up for ImageEngine.
Navigate to this address using the URL bar in your browser and it should take you to that image. If it loads successfully, you know your images are being served via ImageEngine.
Step Two: Passing Directives to ImageEngine vs. Imgix
Just like Imgix, you can also render specific versions of your images by using commands passed through the image CDN engine using URL parameters with ImageEngine.
For the most part, these are very similar. The chief difference in implementation is that you can either pass directives to ImageEngine using path syntax or by appending them to the query string using the imgeng parameter while Imgix only works using the directives as query string parameters.
Here are some examples:
Setting an image width of 320px using Imgix:
https://myimages.imgix.net/myimage.png?h=320&w=320
Using ImageEngine:
- Using the imgeng parameter:
https://myimages.imgeng.in/myimage.png?imgeng=/w_320/
https://myimages.imgeng.in/w_300/http://mywebsite.com/myimage.png
In a comparison of the two Image CDNs, one of the main differences that stood out was Imgix relying on its more extensive API and user input to optimize image content whereas ImageEngine does the majority of its image optimization automatically, without any user input.
Since ImageEngine already goes above and beyond to optimize your image content automatically according to the context they are accessed in, you don’t need to do anything to optimize images yourself. Directives are there for you to use in specific situations where you want to render an image a certain way but will override whatever automatic optimization ImageEngine would have applied.
It’s also worth noting that ImageEngine allows you to set directives for an image or whole path of images as settings from the dashboard:

This might be a more accessible and user-friendly way of doing things if you prefer working with an interface over implementing directives in code.
And, that’s it! Your images will now be delivered via the ImageEngine image CDN and take full advantage of its device detection and image optimization capabilities.